Zion National Park in 1.5 Days: Popular Hikes and Underrated Gems
Zion National Park is the most popular national park in Utah and the third most visited national park in America (based on data from the National Park Service). It’s often a first stop for people traveling to Utah’s other national parks.
That was the case for us when we visited in October 2020. Our whole trip would take us along the Grand Circle route in over the course of 12 days. Because of that, we only had 1.5 days in Zion National Park before we had to move along. Since many people do this road trip, I wanted to share our itinerary to help you make the most of your time in Zion.
The greatness of Zion is not just in its beauty but in how much there is to do. There is a wide range of hiking trails that vary in difficulty from easy to very strenuous. There is camping, mountain climbing, and horseback riding. There’s also kayaking throughout the greater Zion area.
After reading that you might be wondering how you can possibly do Zion in just 1.5 days. Well, you can’t. However, that does not mean you can’t still do enough to appreciate the grandeur of the park. Come along as we explore Zion and how much you can do in under two days!
Updated 05/2023
Disclaimer: This post may contain affiliate links. If you make a purchase through one of these links, I will earn a small commission. This occurs at no added cost to you.
West Rim Trail
| Length | 16.2 miles for entire trail |
| Elevation Gain | About 1,500 feet for this section of the trail |
| Time | 3 – 4 hours |
| Difficulty | Fairly strenuous on Walter’s Wiggles and the steeper sections before Refrigerator Canyon |
| Shuttle Stop | #6 The Grotto |
Our first hike is the West Rim Trail. Try to get into Zion by 1:00 p.m. to have ample time for this long hike. The whole trail is 16.2 miles, but to see some great views of the canyon you only need to go up about 4.5 miles.
I’ll refer to this hike in five parts: the initial climb away from the Virgin River, Refrigerator Canyon, Walter’s Wiggles, Scout’s Lookout and then the last one to two miles farther up the rim. If you have time to go farther, by all means do so!

The Initial Climb
The first part of the hike starts as a gradual ascent, but it quickly becomes steeper as it nears Refrigerator Canyon.
The ascent here is not the most scenic compared to the rest of the trail. Most of the fun in this part of the trail is in the anticipation of what awaits you as you gradually climb the wide switchbacks away from the river.
While relatively unremarkable on the way up, the hike back down this section treats you to some good views of the canyon.
In my opinion, this section was the most difficult of the whole hike as there are not many reprieves from the sun. It’s relatively towards the bottom of the canyon where the heat builds up throughout the day, and then it gets pretty steep towards the end.

Refrigerator Canyon
Fortunately, once you reach Refrigerator Canyon you enter a shaded section of the trail giving you a break from the hot temperatures. The trail also levels out compared to what you just came from and where you’re about to go (Walter’s Wiggles); so, overall, this is an easier section of the whole trail.
If you enjoy bird-watching this canyon is a fun place to see various birds soaring from place to place. The walls provide an echo chamber that make the various bird songs seem magnified, too. If you’re lucky, you might glimpse some of the rare Mexican Spotted Owls that call this section of Zion home.
Compared to the rest of the hike, there aren’t a whole lot of great views through Refrigerator Canyon. Its charm is more in the climb itself and observing the canyon geography from a close-up perspective. It is also just nice to be in a cool section after coming from the sun-exposed trails preceding here!

Walter’s Wiggles
After finishing Refrigerator Canyon, the vaunted Walter’s Wiggles await. Many people – who don’t go on to do Angel’s Landing, at least – consider these the hardest part of the trail. They’re a series of 21 switchbacks with an elevation gain of 250 feet.
My advice for dealing with the Wiggles is to take your time. Take in the scenery. Listen to the birds. Chat with some of your fellow hikers. There are not a ton of “stunning” views here, but it is a good place to look for some of the smaller details of Zion, like chipmunks scurrying on the ground, plants growing through the rock wall, or what the iconic Zion sandstone looks like close up.
As long as you do not try to rush this climb, you’ll be fine. The challenge of the Wiggles can be enjoyable as long as you respect your limits and don’t go beyond them.
The only part that I found difficult was on the way back down. Towards the very beginning (when descending), one of the switchbacks is rather steep so you do have to be careful to not let your momentum get out in front of you causing you to slip or fall.


Scout Lookout
Your reward for getting to the top of Walter’s Wiggles is Scout Lookout, a relatively flat overlook that gives some great views of the surrounding scenery.
From here you have three options for your next move: You can go on to the thrills of Angel’s Landing, the solitude farther up West Rim Trail or you could head back down the trail to either leave time for a small hike in the evening or some relaxation while you watch the sunset.

Farther Up the West Rim Trail
I suggest going farther up the West Rim Trail for three reasons:
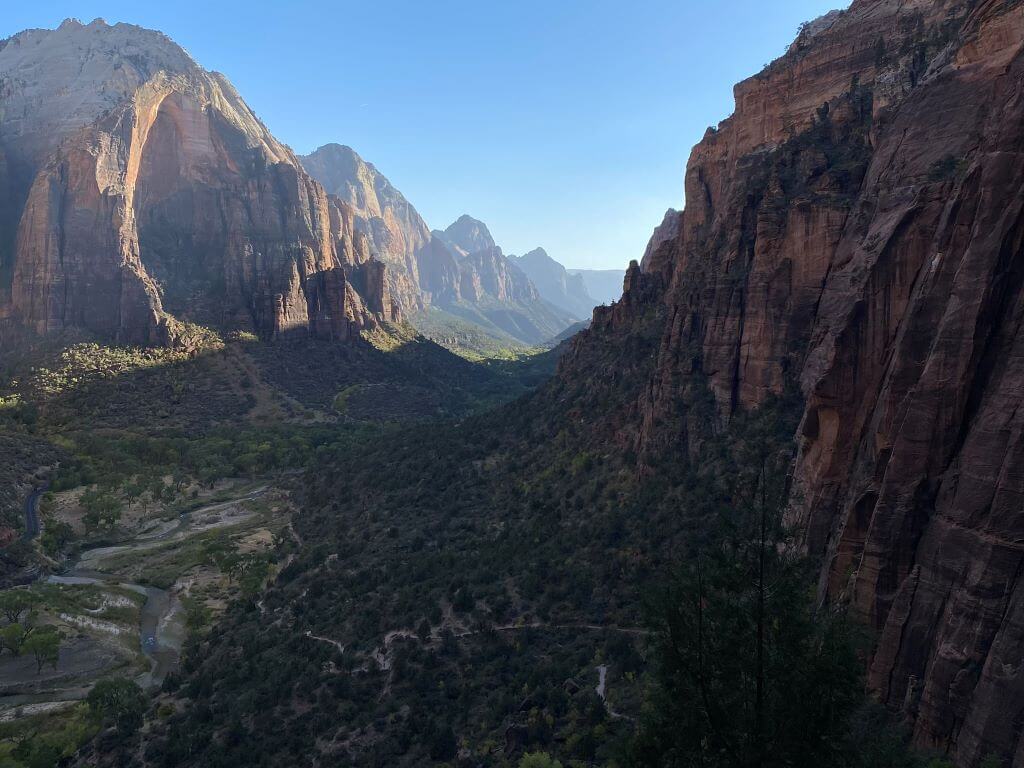
1) By this time of day, Angel’s Landing is likely going to be packed (my picture is from 2020 when COVID-19 was still raging which is a main reason it was so uncrowded). It will take a long time, depriving you of time that could be spent wandering along the West Rim Trail to see many of the same things only…
2) from a higher vantage point. The heights of the West Rim Trail actually exceed those of Angel’s Landing, giving you a better view.
3) Peace, quiet, and solitude. There was almost no one else on the West Rim Trail as we hiked up another mile or so. Being at that elevation with those dramatic views of the canyon floor while all you can hear is the wind is an experience you will not get from too many other places.
Honestly, I do not think you can pick wrong. If you want spectacular views away from the crowds, go up the West Rim Trail. If you’re getting tired, rest for a bit, and then go back down the trail. Looking for a challenge? Go up Angel’s Landing.
Regardless of what you do, make sure you leave yourself plenty of time to stop and look at everything that nature has to offer. There are so many stunning panoramas over every incline and around every turn. The views are almost overwhelming in their beauty if you are there as the sun is setting.
After you finish your hike it’s time to relax. If you have some time, check out the simple yet pretty Pa’rus trail or the Zion National Park Visitor’s Center. The exterior of the visitor’s center has some interesting signage describing the park and a diorama of the canyon detailing where all of the main sites are in relation to each other.


Angel’s Landing is one of the most challenging trails on that side of the Mississippi. For one of the East Coast’s toughest hikes, check out Old Rag in Shenandoah National Park.
Permits
If you do plan to hike up Angels Landing, you are required to have a permit as of April 2022. Visit Recreation.gov to enter the lottery for a permit.
Zion’s Best Hike: The Narrows (Bottom-Up)
| Length | 9.4 miles total |
| Elevation Gain | 334 feet for the entire trail |
| Time | 4 – 8 hours depending on how far you go, my itinerary factors in about four hours |
| Difficulty | Moderately difficult due to some deep pools of water and slippery footing |
| Shuttle Stop | #9 Temple of Sinawava |
You’ve likely already seen this said if you’re planning a trip to Zion, and I’m going to repeat it: The Narrows is a once-in-a-lifetime experience. All the pictures you see online look great, but they do not do it justice. Once you are down in those slot canyons, you’ll understand.
My two biggest pieces of advice for hiking the Narrows are 1) get there early and 2) be prepared to get wet.

Arrive to the Narrows Early
Unless you want to be hiking the Narrows in large crowds, you should try to get one of the first shuttles to the trailhead. We left while the stars were still out. Besides getting views of the sun rising while down in the slot canyons, you also get to hike this trail in relative isolation which makes the experience so much better.
If you get there early, you’ll see what I mean on your return hike back to the trailhead. Even when we were there at the height of the COVID-19 pandemic, there were still large throngs of people setting out around 11:00 a.m.
Be Prepared to Get Wet
Part of the uniqueness of the Narrows hike is that most of it has you walking through the Virgin River. Much of this is only ankle to knee deep, but there are sections that went up to my waist (for reference, I’m 5’11”). If you go all the way to Big Springs, there are parts that can get up to your chest.
Waterproof gear rentals are available at Zion Outfitter located near the entrance of the park. They offer everything you could need. You can head over to my post detailing the practical info on Zion to learn what you might need or go straight to Zion Outfitter’s site to reserve your gear.
What it’s Like to Hike the Narrows
The first mile is on a paved trail called the Riverside Walk that runs, appropriately, along the river. This trail is pleasant enough with all the green flora growing along the Virgin River, but it is little more than a warmup for the Narrows itself.
About two miles into the hike you’ll come across Mystery Falls, a skinny waterfall coming down the sheer cliff side. If you’re hiking in the afternoon you may get to see some more intrepid people rappelling down the canyon through this section.
Including the paved section at the start, we only went about 3 miles along the trail, turning around near Wall Street.
Right before Wall Street is a side canyon named Orderville Canyon. I hiked into this canyon for about a quarter mile or so. The walls are steeper and somewhat more closed in than the main trail, so it is a nice little excursion from the main Narrows trail.
If you go another two miles, you’ll come to Big Springs. At this point you’ll have to turn around. There are deeper sections of the river on your way to Big Springs making a waterproof backpack handy.
If you are only in Zion for 1.5 days, then you should turn around near Wall Street like we did to save yourself time for other hikes. The return hike through the river will be a new experience. Much like the West Rim Trail, the slot canyons will look markedly different with the sun overhead causing different colors and shadows among the rocks from when you walked in.
Regardless of how far into the Narrows you go, make sure you take time to look around you, especially up. The sight lines up the slot canyons to the sky above are so dramatic. For many people, it is possibly the most unique thing they’ll see in their entire lifetime. Seeing various Zion peaks and then the sky simply appear above the canyon walls is just absolutely stunning!


Emerald Pools Trail
| Length | Roughly 2.5-3 miles |
| Elevation Gain | 400 feet if going to Upper Emerald Pool |
| Time | 2-4 hours |
| Difficulty | Pretty easy with a gradual climb, does get a little steeper towards Upper Emerald Pool |
| Shuttle Stop | #5 Zion Lodge |
After resting and having lunch (I suggest Zion Brewery), it’s time for another hike. We chose to do Emerald Pools as it’s typically listed as one of the highlights of the park.
There are three pools: lower, middle and upper. The trailhead is located across the highway from Zion Lodge.
If you do the whole Emerald Pools Trail, it is roughly three miles. From the middle pool to the upper is a little strenuous but doable. Unless you are really short on time, you should do the whole length of the trail in a counterclockwise direction (starting with the lower pool) as it’s relatively quick and the views coming back down in this direction are fantastic.
There are a couple of things to note about the Emerald Pools. The views of the waterfalls and pools are dependent on how much rainfall or snowmelt there has been recently. During dry times, like when we went, you might be disappointed if you are expecting dramatic water scenery.

Be careful when getting that Instagram-worthy selfie. Deaths have occurred along this trail, with most of them being people standing too close to the edge of the trail and then slipping on wet rocks. On our hike we saw several people doing exactly that, and every single time it made me nervous. Those pictures aren’t worth it!
Lower Emerald Pool
The hike to this pool is a pleasant hike with most of it being along the Virgin River. If you’re lucky, you’ll see some of the local muleskin deer eating vegetation right off the trail.
The highlight of this trail – and one of the highlights of the whole Emerald Pools Trail – is when you reach the pool. Your walk is along the cliff behind the waterfalls feeding the pool. Even though it was dry when we were there, there were still two to three small falls coming down over the rocks. Overall, it makes for an attractive scene with some of Zion’s cliffs off in the distance.
Middle Emerald Pool
After the Lower Emerald Pool, you’ll start the climb up to the middle pool. I’ll be honest, I do not remember much of this part of the trail. The trail itself was somewhat unremarkable, especially compared to everything else at Zion.
Now, even though I am not speaking too highly of this part of the trail itself, that is not to say it doesn’t have its merits. When you reach the middle pool there are some absolutely gorgeous views of the whole canyon. Some of my favorite pictures from the whole trip were taken near this section.


Upper Emerald Pool
Getting from the middle pool to the upper is the only difficult section of this hike. It is a little steep with some poor footing in a couple spots. As long as you take your time, you’ll be fine. If you know you’re unsteady on your feet, you may want to bring hiking poles.
Like the Middle Emerald Pool, there are some more views of the rest of the park to take in on your way up, so make sure to take your time to take in the surroundings.
When you reach the top of the climb, you enter an amphitheater with three sheer cliffs raising up to the sky. It’s from here that water falls down to feed the pool. Even if you’re here when it has been dry, it’s still impressive to look up the surrounding cliffs to marvel at the geological forces at play.
Depending on the time of day, this is a good place to bring a picnic and take a bit of a break from hiking. There are lots of places around the pool to sit that afford good views while you fuel up for the rest of the day.

Zion’s Underrated Gem – Watchman Trail
| Length | About 3.75 miles including short loop at the end of the trail |
| Elevation Gain | 368 feet |
| Time | 1.5-2.5 hours |
| Difficulty | Moderately difficult, particularly if it’s hot, with some steep sections |
| Shuttle Stop | #1 Visitor Center |
If the West Rim Trail and the Narrows weren’t so absolutely amazing, the Watchman Trail would easily be my favorite hike that we did in Zion. Watchman does not get a lot of love when you read other guides online; I will agree to disagree. At the very least, it’s an underrated hike.
Due to the above, Watchman is relatively uncrowded. Between the lack of people and the vantage point over the southern end of the canyon, it’s a great place to watch the sun set behind Zion’s cliffs.
(You might want to check out Weeping Rock, Hidden Canyon or Observation Point instead, but when we were there those were all closed, so I can’t really compare Watchman to any of them.)
The Watchman Trail is about 3.75 miles round trip if you add the short loop at the end of the main trail. You should add the loop. It is short, flat and gives different views of the canyon below.
Asides from the views at the end of the trail, I also enjoyed the desert feel of this hike. The first 0.5 mile or so is lacking in sites, but I found the emptiness to be peaceful.
Once you get through this section, the trail starts to get more difficult. It’s a moderately steep climb up the trail till you get to the end. There’s not a whole lot of shade. If it’s a hot day, make sure to bring plenty of water and snacks.
If you’re at the end of this trail near sunset, you should stick around at the top to watch the red and orange glow of the rocks as the sun drops below the horizon. The views of Watchman Peak at this time of day are gorgeous.


Practical Info for Zion National Park
That was all the fun stuff in Zion National Park, but what about the more practical things like eating, lodging and getting around?
I have you covered with that, too. Just click the link here to read all about the logistics that go into visiting Zion!
If You Have More Time
One and a half days only allows a brief glimpse into some of the highlights that Zion has to offer. While it is possible to fit a lot into this short period of time, you will almost certainly come away wanting more!
As soon as our trip was done, I was already making a list of things to do when I have the opportunity to return. Here are some of the things I think would be worthwhile with more time in Zion.
Hike the entirety of the West Rim Trail
The whole West Rim Trail is about 16.2 miles running between Lava Point on the Kolob Terrace and the Grotto in the main canyon. It can be done as a day hike or two days with some camping along the trail. With Zion recently being named an International Dark Sky Park, it might be worth camping along the isolated plateau to do some stargazing.
Hike all the way to Big Springs in the Narrows
With every turn through the Narrows offering different sights, I would love to return to do the whole bottom-up hike. It’s not so much that I felt like I missed out on anything, but it felt incomplete.
Hidden Canyon, Weeping Rock, and Observation Point
I’m lumping these three together because they were all closed due to trail damage. These three are consistently considered some of the best hikes in the park. Hopefully, they’ll be open for your trip.
Hike Angel’s Landing
If I had another day, I would get there early before the crowds start to gather to give me the chance to do this hike without feeling rushed.
Canyon Overlook
Canyon Overlook is a one-mile trail with an access point just past the exit of the Zion-Mt. Carmel Tunnel when leaving the park. It offers dramatic panoramas of Zion Canyon.
We were not clear on where the parking lot was, so we made the mistake of driving right by it. Since my wife was driving our RV rental for the first time (and the parking lot was not very big), it would have been too much of a hassle to turn around.
Don’t be like us: Drive slowly and be ready to pull off to park once you exit the tunnel.
Explore other sections of the park
A lot of people think that Zion National Park is just the famous canyon. There is much more to it than just that, though.
There’s also Kolob Canyon and Kolob Terrace to the northwest and the Desert Lowlands to the southwest. They lack some of the jaw-dropping sights of the main canyon, but they make up for this by being less crowded and giving you more of a primitive experience.
The One Thing I Would Have Done Differently
Despite how much I loved Zion, there is one thing I would have done differently: I would have skipped Emerald Pools to do the whole length of the Bottom-Up Narrows hike.
I did enjoy Emerald Pools, but now that I’ve done each, I would definitely spend more time in the Narrows. This isn’t a recommendation against Emerald Pools, but a strong recommendation for the Narrows.
Maybe had we been there in the wet season, I would feel differently. When we were there the waterfalls and pools were relatively unimpressive compared to everything else we saw throughout the park.
Keep in mind, this is only if you are pressed for time. If you have more than 1.5 days, then you can and should do both.
More Posts for Planning Your Grand Circle Road Trip
Here are my guides to more of the Grand Circle’s stops.
- Bryce Canyon
- Grand Canyon
- Las Vegas
- Moab (Arches and Canyonlands)
- Popular Detours
- Renting an RV
- Zion Planning
And don’t miss my full 12-day itinerary to planning your Grand Circle road trip!
Thank you for reading this post. Paul Passing Through is a labor of love to which I’ve dedicated a lot of free time. If you’d like to show your support for my blog, you can Buy Me a Coffee to help fund the future of Paul Passing Through. I appreciate any contributions!
Resources to Book Your Trip to Zion National Park
Whether you’re looking for tours, hotels or flights, here are some tools to help get you started planning your trip to Zion!
Look for activities and tours offered through GetYourGuide or Viator!
Search Flights
Still can’t find what you’re looking for? Check out my travel essentials pages for more of my recommendations.
Pin This Post!


